How to install your epoxy resin flooring yourself step by step with the suitable self leveling epoxy floor coating, and how to apply 3D flooring designs and murals in the 3D bathroom floor with transparent epoxy floor paint
In today's article, we'll show you how to make a self-leveling epoxy flooring to achieve the maximum saving of time and money for the family budget.
These self leveling epoxy floors can be considered as one of the best types of flooring, which can be used in both industrial and residential areas.
Epoxy floor coating has an excellent appearance for a long time (at least 10 years) and excellent performance, more than any other floor coating.
self leveling epoxy floor coating - 3D bathroom floor murals designs
You can pour liquid epoxy resin flooring ideas yourself in the rooms of your house, a cottage or apartment, Such a coating does not require special equipment, tools or special production skills, the process of pouring the self leveling epoxy does not require a large amount of time and effort. It does not require significant costs and material resources - currently epoxy floor coatings have almost perfect balance of price and quality.
Self leveling epoxy floor coating: installation stages
Self leveling epoxy flooring is created in several steps and is carried out in sequence. Each of these aspects has its own peculiarities and subtleties of execution of the precision on which depends the final result, so you should be sure to read before the start of the installation of your 3D epoxy resin floor, and strictly carry out the process of creating the epoxy floor coating. Only in this way you can guarantee the durability of the epoxy flooring, and it will look really beautiful and stylish.
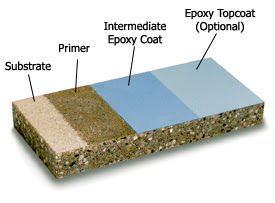
Liquid epoxy resin floor coating should be applied only to the pre-prepared base. This task is in the complex treatment of industrial pollution (including construction dust and debris, residues of oils, fats and other household or industrial pollution). To perform such work use a powerful vacuum cleaner, as well as various washing solutions to effectively remove oils and fats from the surface. If there are irregularities on the basis or it is chipped, then they must be treated pre-putty - otherwise self-leveling epoxy flooring will not be nice and high quality, and most importantly, durability.
Tip! If it is found that the irregularities are too large, you can create pre-leveling screed, which will help to eliminate all cracks and holes.
Priming the surface
The primer should be applied to the surface of the base in order to achieve the best laying of the self leveling epoxy resin flooring." Thus, the primer material must be applied in several layers, which number depends on the porosity of the base. the primer material of the self-leveling epoxy flooring is applied by a spray- in this case you make sure that on the treated surface there are not puddles formed.
Application of the base layer
Modern self leveling epoxy floor is filled with special resin solutions. To start using the rail level or determined by the deviation from the horizontal surface of the base. Based on the data, it is determined by the thickness of the applied layer - it is in the range of 2-10 mm. Prefab epoxy resin floor paint is poured onto the prepared substrate. Between the connections of various parties, polymeric materials must be at least 10 minutes to dry out a bit, and the joints will be optimal for the alignment.
The beauty and strength of self-leveling epoxy floor coating will be higher if you create a second layer of coating. It is generally used for this special tape for self-leveling floor, as well as polymeric materials. Often, the second layer is decorative and serves only to decorate the floor or make a decorative 3D flooring with 3D floor designs murals.
The first layer becomes completely dry in 5-7 hours. To speed up this process, you need to create optimum conditions in the room - the temperature of 12-25 C.
Epoxy resin flooring: Decorative coatings
epoxy resin 3D flooring - adding the decorative layer
As a rule, after completing the drying of the second layer (this usually requires 5-7 days) on the surface of the floor a special covering material should be applied. The most commonly used material is the epoxy floor paint that not only decorates the self leveling floor, but also protects it from the negative effects of various aggressive media and mechanical damage. If necessary, after a while update the decorative epoxy floor coating to keep the beauty of the appearance of the liquid epoxy resin flooring.
Epoxy resin3D flooringideas
To make 3D floor designs or a 3D bathroom floor you should use a transparent epoxy floor paint coating, bring a vinyl image with 3D floor art with the room dimensions, lay it on the subtract layer in the desired position and direction, then pour the transparent epoxy resin flooring coating to complete the self leveling epoxy floor and get a 3D bathroom flooringdesign.
3D floor art designs - 3D epoxy resin flooring ideas
3D floor flooring designs - self-leveling epoxy floor coating
epoxy resin flooring designs, 3D floors
In this article, we showed how to make a self-leveling epoxy floor coating and epoxy resin 3D flooring. As you can see, the process itself is quite simple, but be sure to take care of the preparation of the base and the acquisition of really high quality and advanced epoxy resin floor paint that will be used to create a floor covering. Since today, the choice of self leveling epoxy coatings is quite wide, from the purchase of their problems should arise. The more - the method of preparing the self leveling floor epoxy resin compositions is not too complicated and often indicated on the packaging by the manufacturer of the building material mixture.
decorpuzzle.com


